|
|
Mig Productions 1:35-scale Hover Tank
Published:
May 14, 2010 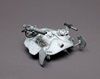 This winter scheme is just one of many that modelers can use to finish Mig's Hover Tank. 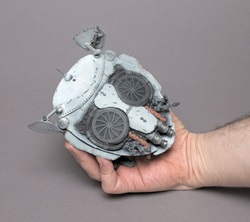 Mig's 1:35 Hover Tank has a lot of detail and nice photo-etched parts.
Unfortunately, the instructions, while required, aren’t as helpful as they could be in assembling the hover tank; they mostly show where the parts go on an already assembled model.
Assembly: Caution customers that some care should be taken when removing resin parts from their plugs. If stressed, resin can fracture, and if the heavier parts are dropped, they can easily break. I used a razor saw to remove the parts from most of the plugs and cleaned them up with sprue cutters and a file.
The tank’s hull comes in two pieces. The lower hull had a huge plug that I removed using a motor tool and a medium burr. Remind your customers to wear dust masks for this sort of work, since resin shavings are a respiratory irritant. Also, resin has a distinct odor, so if your customer doesn’t have a dedicated workshop, they might want to warn their family that there may be a weird smell from the kit.
The photo-etched fans and grilles are very nicely detailed and went on without any fuss. The legs to the crab-like hover tank are articulated and can be modeled retracted or deployed. I drilled the leg joints with a 5/64" bit to accommodate the pins. I modeled them deployed and used a painter’s palette to support the hull while positioning and gluing the legs.
All of the pieces fit together well and were very clean, requiring no filling.
Marketing: One of the great things about sci-fi models is the complete artistic license they afford modelers when it comes to finishing.
What’s useful to know here is that techniques for finishing World War II or modern armor are just as relevant for finishing a sci-fi piece. Advice can be garnered from a number of resources. I used an article by Bill Plunk in the May 2010 issue of FineScale Modeler as a guide. Osprey Publishing has just published a new title, Painting and Finishing Techniques (ISBN: 978-1-84603-263-9, $19.95), which covers everything from pre-shading to finishing with oils.
With this information, you might be able to snag hardcore armor builders who may have otherwise passed.
Consider stocking some 1:48- and 1:35-scale aircraft and armor decals nearby that have interesting nose art and numbers. These are a low-cost add-on that can really help a modeler spruce up the kit.
Practically all of the painting was done with Acrylicos Vallejo Model Air and Model Color paints. The wide ranges of colors airbrush very well, go on evenly and provide great coverage.
Mig Productions makes a line of enamel washes and pastel pigments that modelers can use to dirty up the hover tank and make it look like it’s seen a lot of action. Provide a supply list with finishing suggestions that use some of these products. It may take a little work, but it may also help you make multiple sales.
VITAL STATS
Product: Hover Tank resin kit
Maker: Mig Productions
Scale: 1:35
Stock No.: F 35-652
MSRP: $80
Other products used: Acrylicos Vallejo RLM Colors II (No. 71166) and Winter Weathering Set (No. 72220); Mig Productions Dark Wash (No. P220) and Neutral Wash (No. P222)
Availability: Visit www.migproductions-usa.com or e-mail [email protected]
BOTTOM LINE
- Nice detail
- Minimal touch-ups required
- Unclear instructions
|
|
|
|